


By Geno Sharp
Building Big Earl's Wine & Spirit in O Scale
All Photographs by Geno Sharp.

Hello, gang! We are back in the corner again! No, we are not in trouble. We are in a new place with a new look, but still the same ole corner. I would like take just a minute to thank The Modeler’s Journal for inviting me to be a small part of their new venture, and I look forward to continuing to share the hobby with all of you.
O scale 2-rail modeling seems to get lost between the HO scale and the O scale 3-railers in the hobby world. Except for a few modeling resources dedicated to 2-rail, there is just not much out there. In the upcoming issues, I hope to bring more attention to this often overlooked section of the hobby and encourage other O-scalers to do so as well. So, welcome to Geno’s Corner and let’s get after it!
In this issue, I’m going to show you how I built Big Earl‘s Wine & Spirits on the cheap using a free shipping box, dollar store foam core board, acrylic craft paint, and some custom-made, as well as a few commercial detail parts. So, come on and follow along and let’s get Big Earl in business.
The idea for this project started out with me poking around in my scrap boxes looking to create a structure for my new South Dixie layout. Now, as you O-scalers out there know, you can spend a small fortune in just structures for your layout, and a lot of O-scalers (myself included) try to model on a budget - and a small one at that. Most of the time that means scrounging items wherever you can. The rivet counters and the fine scalers out there probably will raise their eyebrows at this project, but if you can settle for a simple, yet reasonably-detailed structure for your space, this project is right up your alley.
Anyway, while flipping through various scrap pieces, a shipping box that was laying around the Train room caught my eye. (See Figure 1.) I get these boxes free from the postal service for my eBay business.) For whatever reason, I began to see it as the basic footprint of a structure, and I decided this would be my starting point.


As you will see in some of the pictures for this project, I do my scratch builds in a kind of random fashion, not exactly in a step-by-step form. Be advised: I have tried to arrange the photos in a step-by-step order so that it will be easier for y’all to follow.
I really had in mind a large, brick structure for my space, so I began by tracing the outline of each side of the shipping box onto a piece of foam core board that had the paper peeled off of one side. (I get poster-board-sized sheets of foam core from the dollar store for a buck apiece.) We will use the foam core to achieve the building’s brick facade. Then, with a sharp hobby knife and a straight edge, I cut out the sides for the structure. (See Figure 2.)
Once I had the walls cut out, I began to emboss the brickwork into them; for this, I used a straight edge and a toothpick. (See Figure 3.) I chose to eyeball the measurements for the mortar lines, but if you want finer detail on your structure, you could measure off and mark guidelines. But that was a little more than I wanted to put into this project. If you look at older buildings, you’ll notice that much of the brickwork is not perfectly formed, anyway.
When all of the embossings were complete, it was time to start giving the structure direction and purpose – its “arms and legs,” if you will. My plan was for this to be a working industry, so I needed to give it characteristics to match its purpose. The industry would be rail served, so I needed to provide ways to receive and ship freight; this included service doors and a loading dock.
I placed a full-size boxcar on the track and measured the height from the layout base to the boxcar door opening to determine the correct height of the loading dock. Using these measurements, I cut the dock door openings and painted the outer walls with a burnt umber acrylic craft paint thinned with a few drops 50% rubbing alcohol. (The reason I use 50% alcohol when working with foam core board is that stronger alcohol could melt the foam; you could use water to thin the paint as well, but I have found that the alcohol blends with the acrylic paints much better and dries very quickly.) Once the paint had dried, I added overhead bumpers (cut from drinking straws) and side trim (styrene strips) to the dock doors. (See Figure 4.)

I cut one of the ends off of the shipping box and then firmly hot-glued three of the brick walls to the box, leaving off one of the end walls for now to allow me to work from the inside and to position a (foam core) false floor, in case I decided in the future to model an interior. (See figure 5.) I also used some balsa wood rods to support the cardboard roof to keep it from sagging once roof details were added. (See Figure 6, which shows the open end of the box later in the construction process, but before the wall was sealed up.)
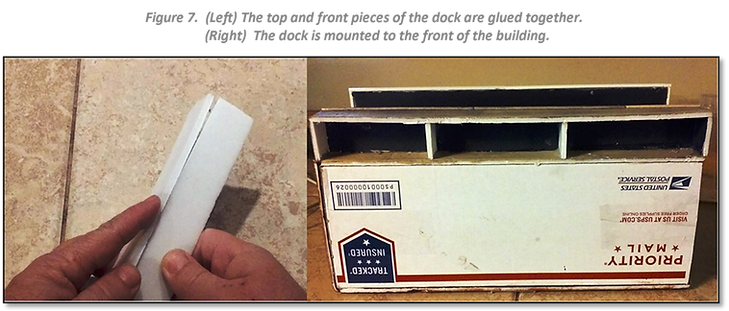
I cut the foam pieces for the dock to match the height of the boxcar floor and the length of the building, and then I glued the dock together (Figure 7, left), adding some supports to help keep the dock surfaces flat. Once the glue was dry, I sanded the edges smooth and painted the dock with a tan acrylic craft paint mixed with the 50% alcohol and a drop of black paint. I then mounted the dock to the building (Figure 7, right).
I used two scrap pieces of ribbed styrene to make the dock doors and painted them silver; after the silver paint dried, I applied a wash (made up of black acrylic craft paint and alcohol). I then mounted them in place. (See Figure 8, which shows the building later in the construction process).
Being in the south, a majority of the older, commercial buildings had some type of awning to help deal with the summertime heat. I decided to add an awning to this structure to capture the feel of the area. I cut another piece of foam to the length of the structure; I then cut the width of the foam so that the overhang of the awning would closely match that of the loading dock. I glued it in place above the dock. I used pieces of green floral wire to make the awning supports and bent the ends so that the wire would angle up from the top of the awning to meet the wall surface. (See Figure 9.) I then glued them in place. (See Figure 10.)

I painted the top of the awning with acrylic aluminum and dressed the edges with styrene strips to give the edges a clean look (See Figure 11).
With all the basics of the structure now in place, I began to work on some of the details for the structure. I took several old factory windows from my scrap box and cut styrene strips to trim out their edges (see Figure 12); I also scaled and cut out doors and trimmed them with styrene strips (see Figure 13).

Once the doors and windows were complete, they were painted aluminum silver with rattle-can spray paint. I then secured some gloss backing to the rear of the windows. (See Figure 14.) I used scrap styrene and several pieces of insulated wire to replicate conduit and an electrical meter and painted them. (See Figure 15.)
When everything had dried, I secured the doors and the windows to the model with hot glue and also added the detail parts and roof details. (See Figures 16 and 17.)
With all the details in place, I secured the last wall to the model. After that, I added scrap styrene strips to the top edge of the structure to act as a cap and painted them with the same acrylic craft paint mix used on the dock. At this point, you could call the structure complete. The only other thing I did was to weather the building with several acrylic washes and some oil paint to achieve the level of aging I desired. (See Figures 18 & 19.)
This truly has been a “dollar store build.” Everything – with the exception of the commercial detail parts, which were picked up from swap meet scrap boxes – was purchased from the dollar store. A custom-built and detailed, O scale structure for a total price of under $12. Momma‘ homemade biscuits don’t get any better than that!
That’s gonna do it for this edition of Geno’s Corner. I hope you enjoyed following along on this build and find some tips and techniques you can use in your modeling. Keep those rails shiny, and I’ll see you next time, back in the Corner.

About the Author
Geno Sharp, a retired deputy sheriff, has been a model railroader for over 30 years. He has built several layouts in various scales during that time and currently is building a new two-rail, O-scale switching layout, the South Dixie Beltline, an urban-based layout set in the mid-to-late 1970’s. You can follow the layout build on his YouTube channel, http://www.youtube.com/gknosmodeltrains.